The Convert 3.x program was designed to convert your QCC database files between the version 2.4 format to the version 3.0 format, as well as make changes to the database structure of files in large groups. This document is set up to guide you through the basic functions and uses of Convert 3.x which comes with QC-CALC Real-Time, QC-CALC SPC, and QC-CALC Enterprise.
Choosing what to do
When you first open Convert 3.x, the Convert QC-CALC Files screen appears. From this screen you can choose which type of converstion you need.
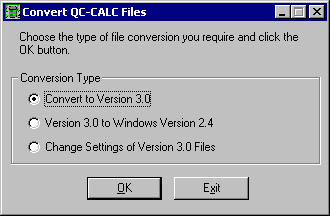
Convert to Version 3.0
This option converts files from earlier versions to 3.0 or higher. If you upgrade your software to a copy of QC-CALC 3.0 or greater, your QCC files from your pre-3.0 versions won’t work correctly unless you convert them to version 3.0 using this option.
Version 3.0 to Windows Version 2.4
This option converts files from version 3.0 or higher back to 2.4. This option is useful if you are moving files between software of different versions
Change Settings of Version 3.0 Files
This option changes the database structure settings of files without changing the version of the file.
Choosing Files
Once you select which conversion you’d like to perform, click OK and the Convert screen appears.
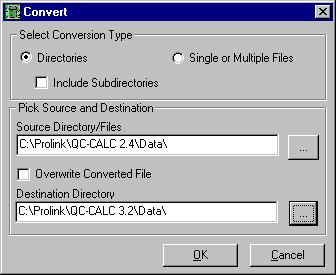
This screen allows you to choose whether you want to convert just a few specific files, or all the files in a specific directory. Clicking on the … button will allow you to browse to the file or folder that contains the QCC files you’re looking to convert.
Checking the Include Subdirectories box will tell Convert 3.x to convert all QCC files in the folder you chose, and all QCC files in folders inside the folder you chose. Once you’ve made your selection, click OK to continue.
Conversion Options
The Modify Database Structure screen will appear. This screen allows you to change settings across all the QCC files that you’re converting. For each property or setting you can chose to Use Existing which makes no changes to that setting, or you can put in whatever you’d like it to be changed to.
If you make any changes you’d like to undo, the Restore Defaults button will bring all settings back to their original state.
When you’ve finished making any changes, click OK and Convert 3.x will make all conversions and database structure changes. Once the conversions are done, a dialogue box will appear to let you know its finished.
Database Properties
This tab contains the basic organization of the database file. You can modify these values to adjust how QC-CALC displays your data.
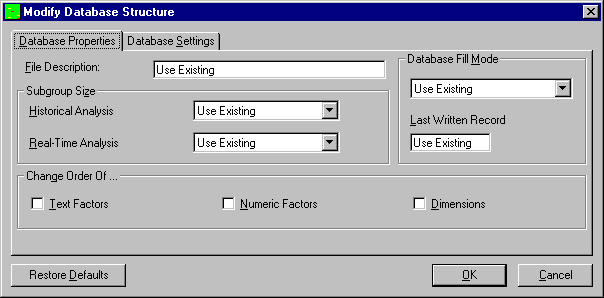
File Description
This is a description of each file that may be used to store additional information about the file. If a specific value was not entered the .qcc file name was saved into this area. It is likely the "Use Existing" option should remain in this box as you would not want to set the same File Description for multiple .qcc files.
Subgroup Size
Historical Analysis - This controls the number of data points that make up a subgroup on the control charts in the statistical menu. The minimum subgroup size is 2 and the maximum is 25.
Real-Time Analysis - This controls the number of data points that make up a subgroup (or points) on the graphs in QC-CALC Real-Time. A subgroup size of 1 is the minimum size where each inspected part is displayed immediately as raw data. If you set the subgroup size to 2, no visible point is displayed until two parts are received. QC-CALC displays the current point within the subgroup in the lower status bar.

Database Fill Mode
This option only applies to Real-Time and tells QC-CALC what to do when the data file becomes full. The maximum parts stored in each database is 100,000. If the file is circular, QC-CALC automatically wraps around from 100,000 back to the first record and begins writing over the old data. If you do not want the old data to be erased, archive the data file to another disk or select non-circular.
Last Written Record
This is the number of the last record that was inspected. It tells you where new data will be added when data collection or data entry resumes. Changing this number to a lower number will effectively erase the records located beyond that number. For example, if 42 is the last written record, changing this to 40 will cause records 41 and 42 to be overwritten when data is received from the inspection equipment.
Change Order Of …
This frame contains three check boxes that allow you to change the column order in which your data is placed in the database. For example, you can swap the position of Dimension 1 with Dimension 2 or Text Factor 2 with Text Factor 3, etc. It is rare that you would need this type of maintenance but it is include should you change your part program and need to change the QC-CALC database to match.
Text Factor - These columns are used to record information specific to a part such as operator name, work order numbers, machine names, etc. In this example, we swap Text Factor 3 (labeled Plant) with Text Factor 4 (labeled Division).
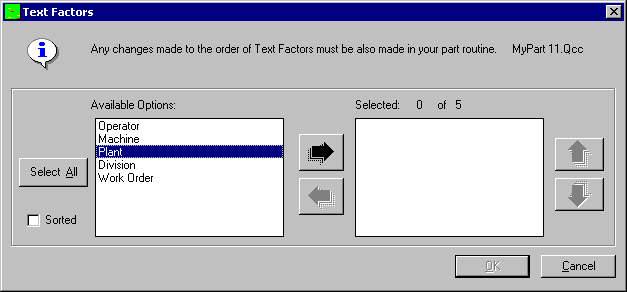
We start with the screen above and move all five Text Factors to the right panel using the right arrow and then using the vertical up and down arrow keys, adjust their final position to look like the screen below. Pressing the OK button causes QC-CALC to move all text Factors to the newly selected order.
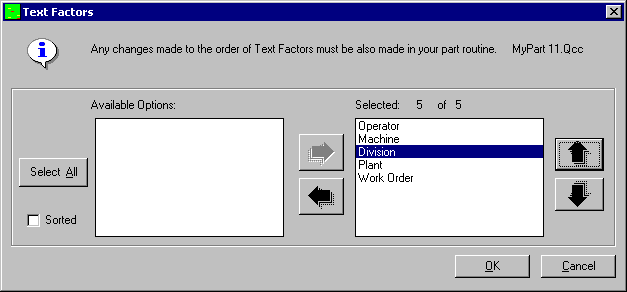
Numeric Factors - Numeric Factors operate the same but only numbers can be entered in these columns, which are mainly used to record information specific to each part stored in the database as well as to help you filter the data to create a more specific analysis.
Dimensions - The measured values operate the same but only numbers are allowed. These columns contain measurement results for each dimension in the database. A total of 3000 dimensions per part and up to 100,000 parts per database or 300,000,000 numbers can be stored in one database. You can move or remove any of these columns of numbers to match your latest part program configuration.
Database Settings
The database settings tab contains items that change the size of the database. You can add or remove records, Factors, assignable causes, etc. If you choose a value less than the value shown (existing), you are warned that information will be lost. When you finish and click OK, you see a screen of the selected items to keep and items to discard. You can change the order of each item as well. Each item is briefly discussed.
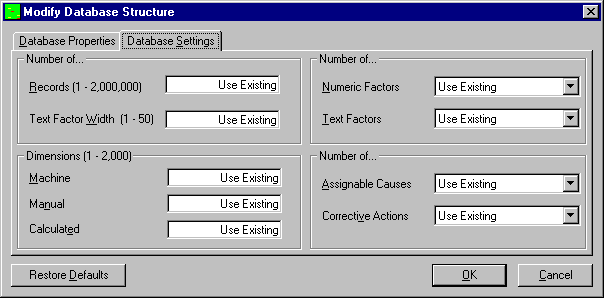
Number of Records (1 – 2,000,000)
This is the number of records (parts) stored in this database. If the number you enter is smaller than the current amount of records QC-CALC takes the number of records you specify from the newest data and discards the oldest.
Text Factor Width (1 – 50)
This is the width of each label stored in the Text Factor columns of your data file. You may choose any width up to a maximum of 50.
Number of Numeric Factors
This refers to the number of columns of Numeric Factors you would like in your database. This number can be larger or smaller than the current value. You will be warned if you enter a value smaller than the present value.
Number of Text Factors
This refers to the number of columns of Text Factors you wish to have converted. You can add, subtract, or move the order of these values.
Dimensions
This is the number of dimensions to convert. QC-CALC has three types of dimensions:
Machine | Dimensions created automatically by receiving data from an inspection machine. |
Manual | Extra dimensions not received from an inspection machine that are entered by hand using QC-CALC’s Windows – Manual Dimensions menu. |
Calculated | You can add Dimensions that are made up of calculations. These are useful for creating features that are not available from the gage. For example, if a plot contains a measure value for one side of a panel and a second value for the other side, you can calculate thickness by subtracting the two dimensions. |
Number of Assignable Causes
The purpose of an Assignable Cause file is to store a list of your company’s Assignable Causes that occur during the manufacturing process. They are used to trace special events that occurred to a part. This selection lets you decide how many Assignable Causes you want to include on each part when an event occurs. The range is 0 to 3 causes per part.
Number of Corrective Actions
The associated Corrective Actions explains what you did to fix the Cause, however, the number of Assignable Causes do not have to match the amount of Corrective Actions and vice versa. Therefore, you may assign up to 3 Corrective Actions per part but the default is two.