How to Activate and Configure QC-Alert
Print Friendly View
written: 01/03/2025
last modified: 02/28/2025

Installing QC-Alert

  1. On the Prolink Software website go to the Downloads page and under Current Versions select QC-Alert.
  2. Select the Download button on the next page to download QC-Alert.
  3. Install QC-Alert. After installing QC-Alert you must activate it.

Activating QC-Alert

QC-Alert is activated through QC-CALC SPC 4.3.

  1. To activate QC-Alert go to Tools > Administrator > QC-Alert and note the Computer ID (you will need this soon).

image.png

  1. Use the Prolink website to generate the Activation Code you need. If you are not familiar with getting an activation code from our website, see this article: https://www.prolinksoftware.com/support_article.aspx?id=148

NOTE: Look for the "QC-Alert License Manager" product in your list of Owned Software and click Activate for that product.

  1. Back in the software, click the Activate button and paste in the Activation Code you obtained from the website.

image.png

Now that the overall QC-Alert licenses have been activated, you must activate the individual copies of QC-Alert you want to use. The bottom area of the Tools > Administrator > QC-Alert Licensing screen shows any copies of QC-Alert attached to the database and is used for this operation.

  1. Highlight the copy or copies of QC-Alert you would like to “turn on” and click the Activate selected items image.png button and the Status column will reflect the change.
  2. Use the Deactivate selected items image.pngbutton to deactivate any copies you no longer wish to use.

image.png

  1. After clicking the Activate selected items button, QC-CALC SPC will confirm how many copies were activated.

image.png

Configuring QC-Alert

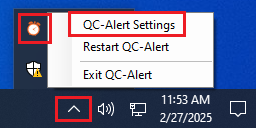
To configure QC-Alert, launch the QC-Alert application, and it will automatically be minimized in the tray area by the clock. To configure the application, right-click the QC-Alert icon and choose the QC-Alert Settings option in the menu. This menu is also used to Restart QC-Alert or Exit QC-Alert entirely.

image.png

The bottom portion of the QC-Alert Settings screen must be set up for QC-Alert to work.

image.png

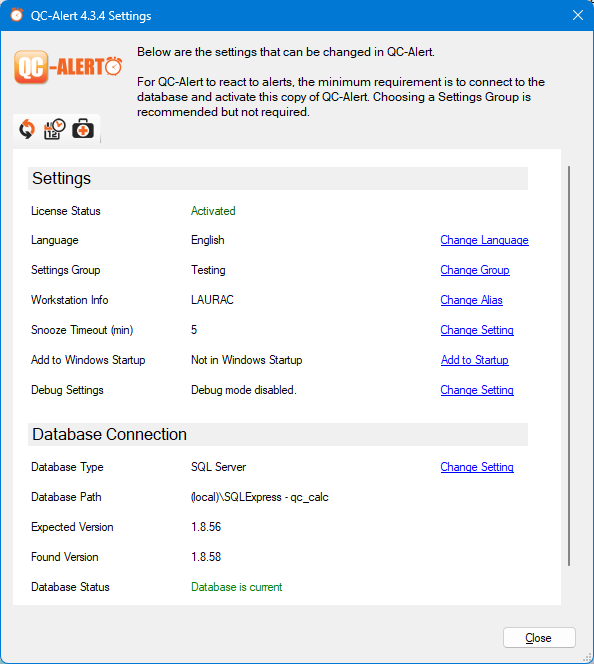
  1. To start, click the Change Setting link for the Database Type option.
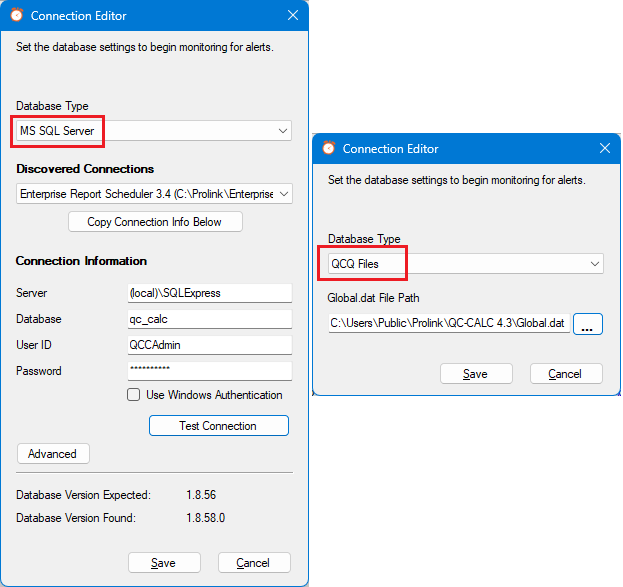
  2. In the Connection Editor screen, choose the Database Type for either “QCQ Files” or “MS SQL Server”, then fill in the remainder of the information for the database type you chose.
  3. When using “MS SQL Server”, if other Prolink products are detected, QC-Alert will find those Data Storage settings and populate the Discovered Connections list. Choose a product from the list and click the Copy Connection Info Below button.
  4. Click the Test Connection button to confirm QC-Alert can connect to the SQL database.

image.png

  1. Choose to receive alerts for a specific Settings Group by selecting Change Group and choosing a Settings Group from the list.

image.png

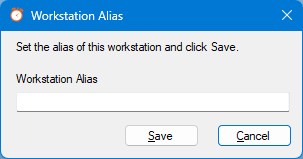
  1. You can also set a custom name for the computer where QC-Alert is installed by clicking Change Setting next to Workstation Info.

image.png

  1. When an alert appears, a Snooze button is provided to dismiss the window for a set amount of time. Use the Snooze Timeout (min) option to control the length of that time (1 to 9 minutes).
  2. Finally, if you want QC-Alert to start automatically when you log in to Windows, click the Add to Startup link.

Using QC-Alert

  1. From the Deliverables tab in QC-CALC SPC 4.3 Pro, click the Add Deliverable button image.png and choose to add a Triggered Action.

image.png

  1. On the Welcome screen of the Triggered Action Editor window, enter a name for the Trigger being created, then choose Date Based as the Trigger Style. Click the Next >> button when finished.

image.png

  1. For Monitor Style, choose the Monitor part files option, then the Choose a static list of part files option in the Part File Monitoring area. Click the Add an item image.png button and choose one or more part files. Once you are finished, click Next >>.

image.png

  1. The previous step will monitor a single part file for new parts, but you can also choose to monitor specific copies of QC-CALC Real-Time or monitor for the presence of a specific trace field. Here's how:
    1. Select Monitor data collection for a specific trace field.
    2. Choose a Trace Field Type of "Text" or "Numeric".
    3. Choose a Trace Field Name to monitor.
    4. Select the Choose a static list of part files option.
    5. Finally, click the Add Trace Field Values button image.png to select the specific trace field values to monitor.

image.png

  1. On the Records screen, specify how many records are expected to arrive to satisfy the trigger. If you need to collect 5 parts and want to be alerted when less than 5 are collected, set the Number of records expected to "5." Click the Next >> button when finished with this section.

image.png

  1. On the Schedule screen, specify how often the deliverable should run. This is how often the deliverable will check to see if the number of expected records arrived on time.
  2. Choose how far back in time the trigger will check for records that meet your criteria.
  3. You can also specify an escalation policy by enabling the last two options on the Schedule screen. Select the Next >> button when finished.

In the example below, the triggered action will run once every hour, looking back 60 minutes in time for any records that meet the criteria. If no records meet the criteria at that moment, the software will wait 1 more minute. If the parts still have not arrived, a level 1 alert will be triggered. If another 2 minutes elapse where no new records arrive, then a level 2 alert is sent.

image.png

  1. On the Actions screen, the list of Actions is displayed on the left. As shown below, highlighting an Action will display the Summary of what that Action will do on the right. The order of the actions can be adjusted by using the image.png and image.png buttons to move a highlighted action around in the list. To create a new action, click the Add action image.png button.

image.png

  1. In the Create New Action window that opens, choose “Send an Alert” and click the Proceed button.

image.png

  1. Name the action in the Action Editor window, choose the run conditions, and the Settings Group or Workstation to receive the alert in the Parameters area.

image.png

  1. The Parameters area of the Action Editor window is scrollable. Further down in this area, you can choose to display a link to a Spec Plan for QC-Gage within the alert. Use the Add Spec Plan Link area to choose the Spec Plan that matches the part file selected earlier.

image.png

  1. The Upon Discovery section is used to customize the alerts for each level of escalation.
    1. Use the Color, Icon, and Keyword lists to customize the look of each alert.
    2. Keywords inserted into the alert message will show specific values when alerted (part file name, date, time, etc).
    3. Select the Save button when done.

image.png

  1. Back in the Actions screen of the Triggered Actions Editor window, you can add more actions or select the Next >> button when you're done.
  2. Ensure the Enabled checkbox is checked on the Finish screen, then click the Finish button. When the alerts are triggered, they will appear like this in QC-Alert:

image.png

Applies To

Enterprise Report Scheduler v.4.2
QC-CALC SPC 4.3 Pro

Category

General Program Information
See more articles in this category