PREREQUISITES
Since QC-CALC will be calling the Buddy, both need to be installed on the same PC. If you have the Buddy installed on a different PC, it will not work even if the data is on the network since applications (QC-CALC) cannot launch other applications on remote PCs.
INTRODUCTION
Let's say you have a report that needs to run every x parts and you want to run it in the Office Buddy. So you set up your Excel Job and it works great. The only problem is, in the Buddy there is no way to know when the parts have arrived. The only place that tracks the inspection of parts by QCC file is QC-CALC Real-Time.
This article discusses a way of using the Auto-Export functionality in QC-CALC Real-Time to launch Excel Jobs in the Office Buddy.
NOTE: This can also be done manually using the normal manual export functionality in QC-CALC. Perform the same steps below for setting up the export, but start with the Export > Export Data menu and omit the Frequency of Exporting step.
For our scenario, we're going to run the "Sample (Excel Only)" Excel Job that comes with the Buddy. We're going to tell QC-CALC Real-Time to send the data every 5 parts since that job is a 5 piece first article report.
STEPS
- In the SPC Office Buddy, make sure your Excel Job is created and ready to go.
NOTE: Please see below in the More Information section regarding considerations for running Excel Jobs automatically.
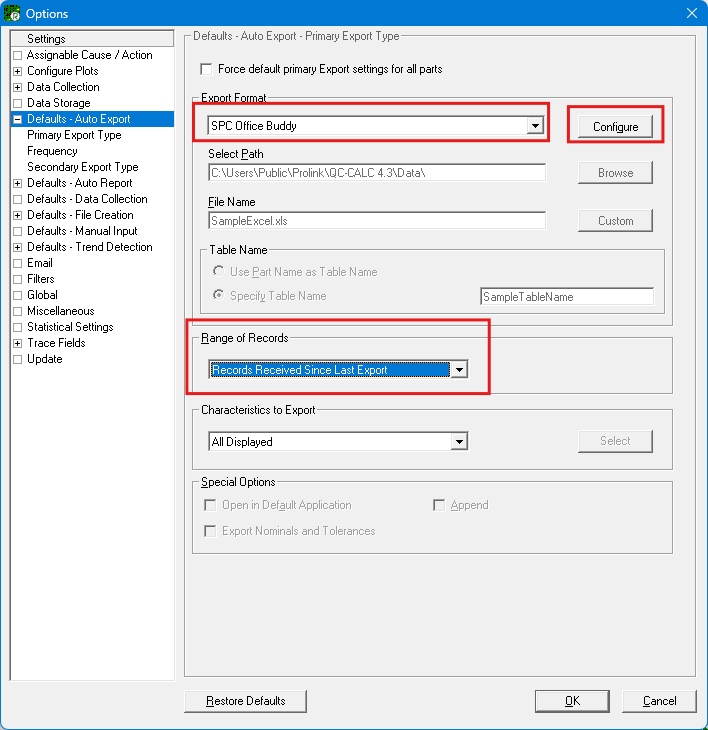
- In QC-CALC Real-Time go to Export > Setup Automatic Export.
- On the setup auto-export screen, specify the export type as SPC Office Buddy. In addition, specify to send the last 5 records (Range of Records to Export) whenever 5 new records are received (Frequency of Exporting). Of course, this can be anything you choose. It is just for our example. Please be advised that the numbers do not have to match. For example, you can send the last 25 parts every 5 new parts.

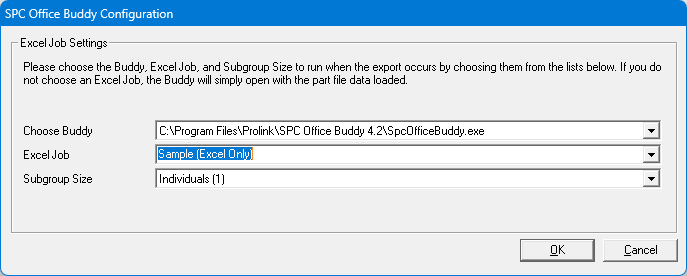
- Click the Configure button and choose the job you want to run from the Excel Job list.
The first list should only have one item in it, but specifies the different copies of the Office Buddy you have installed on this PC. Most people only have one copy installed so this doesn't matter.
The third list specifies the subgroup size to run for the Excel Job. In this case, it doesn't matter since the Excel Job will not be doing any charting or calculating statistics. It is just a straight send of data.

- Click OK when finished on the Configuration screen.
- Click OK to save changes on the Auto Export Setup screen.
- Turn on the auto exporting by selecting the Export > Automatic Exporting menu.
Finished. As you collect parts, you will see the Buddy automatically launch and the Excel Job run each time the counter reaches 5 (my example).
MORE INFORMATION
There are a couple considerations when you are running Excel Jobs automatically or as part of a batch.
- It is not recommended that you check the "Show Excel After Job" on the File Options screen of the Excel Job wizard for any jobs that you will be running automatically. This is because the Buddy will show Excel with your file open when the job is finished. If the automatic job launches again because 5 more parts are measured, the Buddy will try to edit the report and will find that the file is read only. This is because Excel has the report file open. Unless you are planning to close it yourself each time, it is not recommended that this option is set. If it is, please see #2.
- If you do not want your report to be overwritten each time an automatic job runs, it is recommended that you create a custom file name when you set up the Excel Job in the Buddy. On the File Options screen of the Excel Job Wizard, click the Custom Name button and give the output report file a name that contains a date/time stamp. This will keep the report files from overwriting each other each time the job runs.
This also solves the first consideration above since the files are never read only if they are named differently each time.