Are you running parts without an operator present and need to have someone notified when a part is Out of Specification or Control? There are two ways to email an operator from QC-CALC Real-Time when a part is Out of Specification; through Automatic Report or through Trend Analysis. The step-by-step directions for setting up the report is discussed here. Directions for the Trend Analysis method are available here: Email Trend Notification for OOS Part
Setting Up Automatic Reporting.
- In QC-CALC Real-Time, go to Tools > Options > Defaults - Auto Report.
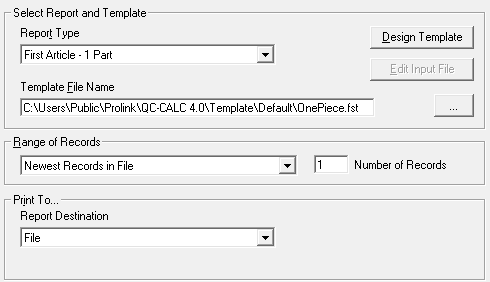
- Choose the Report Type at the top of the screen. For this example, we'll choose a "First Article - 1 Part" report. A popup will appear, prompting you to choose a template.
- Choose any of the standard templates that are included within QC-CALC and click OK.
- Choose the Range of Records on which to report. In this example, we'll choose Newest Records in File, then enter a "1" for the Number of Records value. NOTE: To have the number of records that triggered the report be used as the contents, choose the Use Frequency as Range option and the number of records to use will be the Frequency value you will set in the instructions below.
- Next, choose a Report Destination of "File" in the Print To... area.
- Setup the File output:
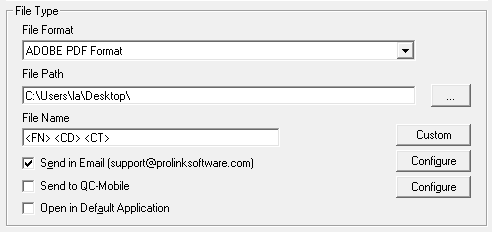
- Choose the type of file you want to create. Adobe PDF Format seems to be the most common choice here.
- Browse or type the path of the file you will create when the report runs. This can be a network path if you would like.
- The File Name can be a value that is unique with each run by using the Custom button. Highlight the content in the box of the Custom File Name Editor screen, hit the Delete key to clear the box, choose "Use Part File Name, Date and Time," and click the Add button. Click the OK button once that is done.
- Sending an email:
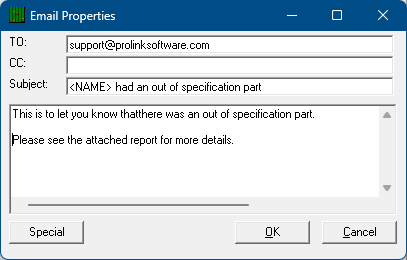
- Check the Send in Email checkbox and the Email Properties screen will appear. If it does not appear, click the Configure button to the right.
- Fill in the To box of the email with any number of email addresses or distribution lists separated by semi-colons. Type a Subject and Message in the boxes provided. The Special button can be used to view the variables that are available to use within the email.
- Click OK when finished.
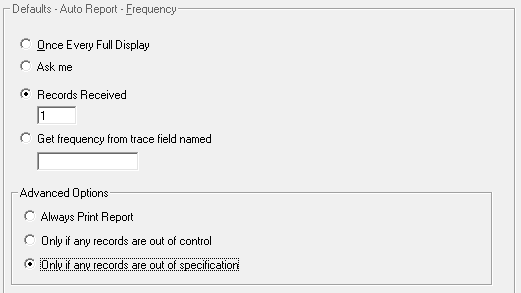
- Next, choose the Frequency option from the tree on the left. This tells us how often a report should run. For this example, we'll choose Records Received and fill in a "1" to match the Range of Records option set in step 4 above.
- In the Advanced Options area, choose the Only if any records are out of specification option to trigger the report ONLY if a value is out of specification. NOTE: If you want to receive a report if a value is out of control or spec, use the "out of control" option here. This will work if your control limits are always inside your spec limits.
- Click OK on the Options dialog to save the default Auto Report settings and these changes will apply to all existing and future part files.
Turning on Automatic Reporting
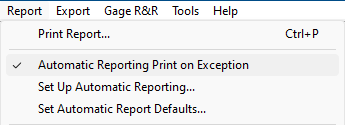
To toggle Automatic Reporting On/Off, choose the Report > Automatic Reporting menu. If it is off, it will say (Off). Otherwise, it will have another message such as (On), Print on Exception, etc.
Turning off Automatic Reporting for Specific Part Files
Once you have the Auto Reporting setup, there may be specific part files where these reports are not required or a different report is required. It is possible to shut off/change the report for specific part files by following the directions below.
- Open the part file that does NOT need this report enabled.
- Go to the Report > Set Up Automatic Reporting menu, and a screen similar to the one used above will be displayed.

- Uncheck the Use default Report settings option at the top of the screen.
- Change the Report Type at the top of the screen to "None" which is shown at the top of the list or choose a different type or template if you still need a report to trigger but it needs to be a different report.
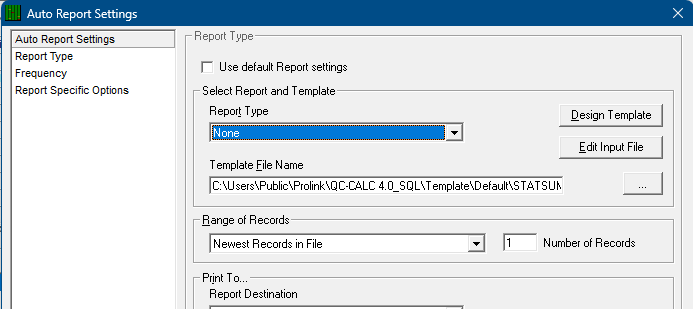
- Click OK and this part file will either no longer trigger a report as records are received or it will trigger a different report.
You have now set up simple automatic reports. If you apply a filter to your data and then turn on automatic reporting, you will be running the automatic reports based on the filtered data.