Categories offer a way to organize files in a hierarchical or tree style. The category setting is set globally for the copy of QC-CALC in the Tools > Options > Data Collection > Set Paths screen. Once set, all data collected will be tagged at the part file level with the specific category and will not be combined with data from other categories. For instance, two copies of QC-CALC Real-Time could be located in different areas of the plant with “Customers > ABC Corp” and “Customers > DEF Corp” as their categories. If they both collect data for a part called “Widget”, then two separate part files will be created in the database named “Widget” under the two categories above. The data from the two files will not be combined.
Since categories follow a tree style like Windows Explorer, they directly replace the PathSwitch functionality in the QCQ file world. Traditionally, if the Data Storage type is set to File Based, a PathSwitch command from a CMM or QC-Gage will redirect the part file to a new folder in Windows. Categories take over this functionality if the Data Storage Type is set to "MS SQL Server."
Setting the Category
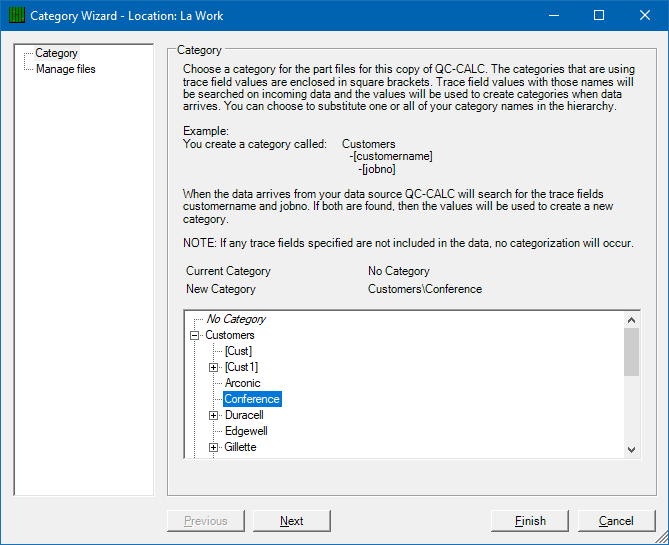
Categories are set via the Tools > Options > Set Paths area in QC-CALC Real-Time. Click the Set button to launch the Category Wizard and assign a new category by navigating the tree hierarchy to the desired category and clicking Next.

NOTE: Editing Categories is not done in this screen. Use the Manage Categories button for this functionality.

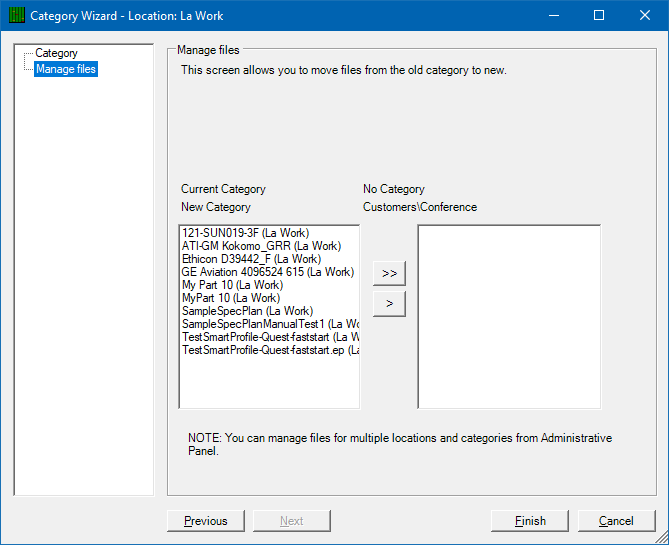
The Manage files screen allows you to migrate existing files from your old Category to your new Category. Use the arrow buttons to move some or all of the existing files to the new category on the right, and click Finish when you are ready to save the new category setting.

NOTE: This migration process is essential in keeping data collection consistent and should not be skipped. Since data collection uses the Category setting, any new data will be tagged with the new category. A new part file is created if new data arrives for a part file that does not exist for the current category. Make sure to migrate all existing part files that will continue to receive data. This way, new data will be received and collected in the correct part file without creating a new one.
NOTE: This screen only shows files from the previous category and does not allow the migration of part files from any other category. This functionality is available in the Database Manager from the Tools > Manage Database menu.
NOTE: All data collected will be placed into the set category unless a PathSwitch is specified in the inspection data. PathSwitch always overrides the categories currently set. The PathSwitch path (i.e., C:\Customers\MyCust\JobNumbers\1234) will automatically be converted into a category path that matches the folder path and is used as the Category value.
Editing Categories
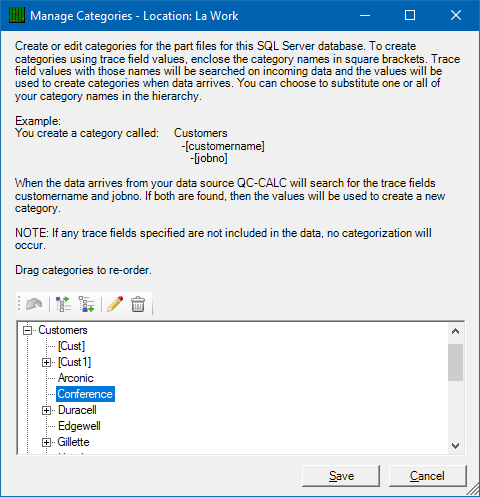
Categories can be created and changed via the Manage Categories button on the Tools > Options > Set Paths screen. The current category nodes are shown in the tree and can be dragged to either re-order or move categories to new root nodes. The toolbar has buttons to create root nodes (the highest level of categorization) or nodes beneath an existing node. The pencil icon allows the editing of a category name. As changes are made to the category tree, the “Undo arrow” becomes active, providing the ability to revert to the last saved list. Click the Save button to save your changes.

Dynamic Categories
Dynamic categories allow categories to be created instantly using trace fields from data collection. They are made by specifying the name of a trace field in the inspection data in square brackets (e.g., [customer]). The Manage Categories screen above shows a dynamic category called [Cust]. Dynamic categories are never shown in the File > Open dialog since they are merely placeholders for the created categories.
In the example above, the category path could be set as Customers\[Cust]. QC-CALC Real-Time will look for a text trace field named “Cust” during data collection. If one is found, the actual customer name will replace the [Cust] part of the path, that category will be created if not existing, and the part file will be assigned to the category. For example, if the “Cust” text trace field in the data has a value of Medtronic, then a category for Customers\Medtronic will be created, and a part file will be created and stored in that category. Dynamic categories can be used at multiple levels in the tree. Each square bracketed word will be searched for trace fields and used if found.
NOTE: If any of the dynamic categories (square bracketed words) are not found in the inbound data or if the categories are all found and any of the values are blank, the entire category path is negated, and a part file is created at the root level under the No Category header. This can be used intentionally if the data can only be categorized under certain circumstances.
NOTE: Dynamic categories can create new part files at the record level since any record could have a different value in the trace field. Make sure this is the intended purpose before using them. If not, it could cause rapid fragmentation of the data.
Using Categories
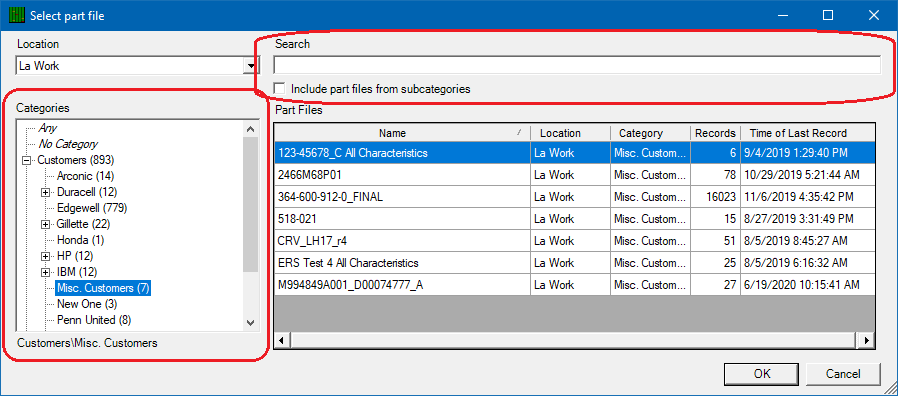
 The screen shows the Categories tree on the left side when opening a part file via the File > Open menu. The Part Files list on the right will automatically filter to only the available part files when categories are selected on the left. In addition, a Search box can filter the list of part files further, and a checkbox to search subcategories is available. Choose the category on the left, select the part file from the list on the right, and click OK to open the selected part file.